How to setup a Custom Private Email Relay like Hide My Email - Part 1

In this post I'll explain why you should use a custom Private Email Relay and how you can setup one using AWS.
Checkout What is A Private Email Relay? If you don't know what this is and why you should use one.
This is Part 1 of a two part article. Here's what I'll cover in each part.
- Setting up the Relay and handling Inbound Emails.
- Adding support to Reply to emails via the Relay.
Reasons to setup a Custom Private Email Relay
-
You can use your own Domain.
-
You can create Memorable addresses, rather than using some random gibberish.
- This can be especially helpful if you don't have your personal device handy and you need to login or share the details with someone.
Setup a Private Email Relay Using AWS
Prerequisites
- Account on AWS
- Basic know how about AWS (we'll be using S3, SES and Lambda)
- Basic know how about programming in Python
- A domain. If you don't have one, you can get one from Namecheap(affiliate link).
- A personal email address where you want to forward the emails
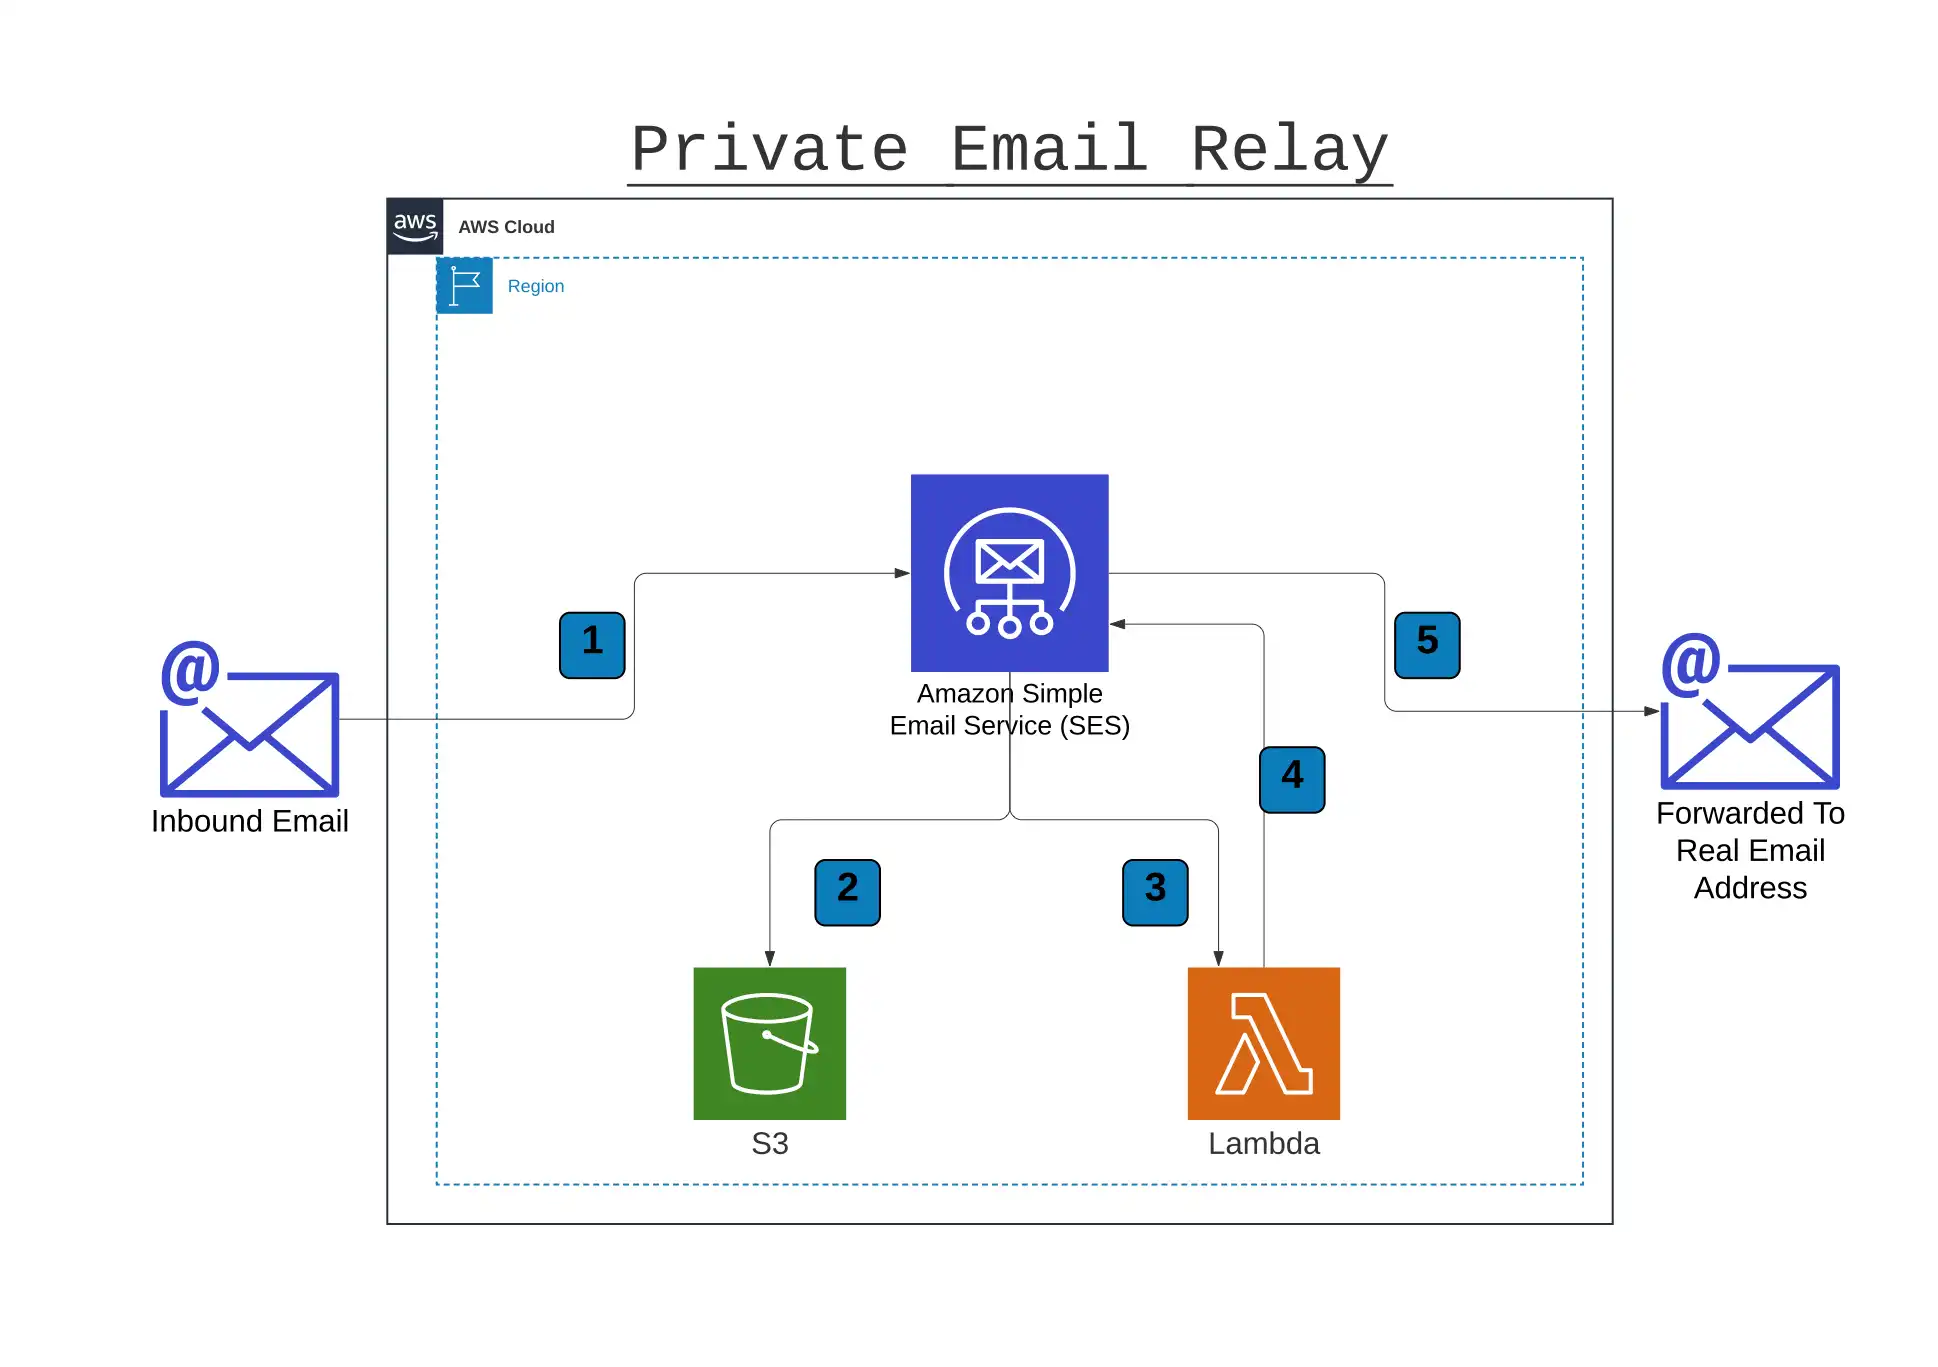
This is how our system will work
- Someone sends an Email to your domain. The email is received by Amazon SES and triggers a SES receipt rule.
- Receipt rule saves the new email object in a S3 bucket.
- Receipt rule triggers an AWS lambda function.
- Lambda function then retrieves the email object from S3 bucket, does some processing and sends it back to SES.
- SES then sends this email to the final destination.
Architecture Diagram

Step 1: Configure Your Domain
-
Verify your Domain in SES, see Verifying a domain with Amazon SES for detailed steps.
-
Next, you need to add the following MX records to the DNS config of your Domain
inbound-smtp.<region>.amazonaws.comwith priority 10, replace<region>with the AWS region you are setting up your resources in.
Step 2: Configure a S3 Bucket
- Create a new Bucket in S3. Make sure you create it in the same region in which you configured SES.
- Next, Apply the following policy to the newly created bucket.
{
  "Version": "2012-10-17",
  "Statement": [
    {
      "Sid": "AllowSESPuts",
      "Effect": "Allow",
      "Principal": {
        "Service": "ses.amazonaws.com"
      },
      "Action": "s3:PutObject",
      "Resource": "arn:aws:s3:::<newBucketName>/*",
      "Condition": {
        "StringEquals": {
          "aws:Referer": "<yourAwsAccountId>"
        }
      }
    }
  ]
}
Replace <newBucketName> and <yourAwsAccountId> with respective values.
Step 3: Create IAM Role and Policy
- Create a new IAM policy and assign the following permissions.
{
  "Version": "2012-10-17",
  "Statement": [
    {
      "Sid": "VisualEditor0",
      "Effect": "Allow",
      "Action": ["logs:CreateLogStream", "logs:CreateLogGroup", "logs:PutLogEvents"],
      "Resource": "*"
    },
    {
      "Sid": "VisualEditor1",
      "Effect": "Allow",
      "Action": ["s3:GetObject", "ses:SendRawEmail"],
      "Resource": [
        "arn:aws:s3:::<newBucketName>/*",
        "arn:aws:ses:<region>:<yourAwsAccountId>:identity/*"
      ]
    }
  ]
}
Replace <newBucketName>, <region> and <yourAwsAccountId> with their respective values.
- Next, create a new IAM Role and assign the previously created Policy to the new Role.
Step 4: Create a new Lambda Function
- Create a new empty Python 3.7 function and assign the newly created IAM Role as the execution role.
- In the code editor, paste the following code in
lambda_function.pyfile, if the file is not already present create one.
import os
from email.message import EmailMessage

import boto3
import email
from botocore.exceptions import ClientError
from email.mime.multipart import MIMEMultipart
from email.mime.text import MIMEText
from email import policy
from email_template import EMAIL_BODY_HEADER

region = os.environ['Region']


def generate_sender_address(from_addresses, sender_suffix):
    split_arr = from_addresses.split()
    from_email = split_arr.pop()
    from_name = None
    if len(split_arr) > 0:
        from_name = " ".join(split_arr)
    from_email = from_email.replace('@', '_at_')
    from_email = from_email.replace('.', '_dot_')
    from_email = from_email.replace('+', '_plus_')
    from_email = from_email + '_' + sender_suffix
    if from_name:
        return from_name + ' <' + from_email + '>'
    else:
        return from_email


def get_message_from_s3(message_id):
    incoming_email_bucket = os.environ['MailS3Bucket']
    incoming_email_prefix = os.environ['MailS3Prefix']

    if incoming_email_prefix:
        object_path = (incoming_email_prefix + "/" + message_id)
    else:
        object_path = message_id

    object_http_path = (
        f"http://s3.console.aws.amazon.com/s3/object/{incoming_email_bucket}/{object_path}?region={region}")

    client_s3 = boto3.client("s3")
    object_s3 = client_s3.get_object(Bucket=incoming_email_bucket,
                                     Key=object_path)
    file = object_s3['Body'].read()

    file_dict = {
        "file": file,
        "path": object_http_path
    }

    return file_dict


def create_message(file_dict):
    separator = ";"
    mail_object = email.message_from_string(file_dict['file'].decode('utf-8'), policy=policy.default)

    from_list = separator.join(mail_object.get_all('From'))
    from_list = from_list.replace('<', '')
    from_list = from_list.replace('>', '')
    to_address = separator.join(mail_object.get_all('To'))
    to_address = to_address.replace('<', '')
    to_address = to_address.replace('>', '')
    msg = MIMEMultipart()
    header_html = EMAIL_BODY_HEADER.format(email_from=from_list,
                                           email_to=to_address,
                                           email_archive_url=file_dict['path'])
    header_part = MIMEText(header_html, _subtype="html")
    msg.attach(header_part)

    message_body = mail_object.get_body()
    msg.attach(message_body)

    for payload in mail_object.get_payload():
        if isinstance(payload, EmailMessage) and payload.is_attachment():
            msg.attach(payload)

    subject = mail_object['Subject']
    recipient = os.environ['MailRecipient']
    sender = generate_sender_address(from_list, to_address.replace(' ', '_'))
    # Add subject, from and to lines.
    msg['Subject'] = subject
    msg['From'] = sender
    msg['To'] = recipient

    message = {
        "Source": sender,
        "Destinations": recipient,
        "Data": msg.as_string()
    }

    return message


def send_email(message):
    client_ses = boto3.client('ses', region)
    try:
        response = client_ses.send_raw_email(
            Source=message['Source'],
            Destinations=[
                message['Destinations']
            ],
            RawMessage={
                'Data': message['Data']
            }
        )

    except ClientError as e:
        output = e.response['Error']['Message']
    else:
        output = "Email sent! Message ID: " + response['MessageId']

    return output


def lambda_handler(event, context):
    message_id = event['Records'][0]['ses']['mail']['messageId']
    print(f"Received message ID {message_id}")

    file_dict = get_message_from_s3(message_id)

    message = create_message(file_dict)

    result = send_email(message)
print(result)- Next, create a new file with the name
email_template.py, and paste the following code in that file. This is to give a nice little touch to the email and display information like from and to address and a link to the original email object in S3 bucket.
EMAIL_BODY_HEADER = """
<table width="100%" align="center" bgcolor="#f9f9fa" style="background:#f9f9fa;padding-top:12px;padding-right:12px;padding-left:12px;padding-bottom:12px;margin-top:0px;margin-bottom:30px;width:100%">
      <tbody><tr>
        <td align="center" valign="top" width="100%" style="max-width:700px;padding-top:12px;padding-bottom:24px">
          <table align="center" width="100%" style="max-width:700px;border-collapse:collapse;padding-top:0px;padding-bottom:0px">
            <tbody>
              <tr>
                <td align="center" style="line-height:150%;padding-left:20px;padding-right:20px">
                    <h3 style="display:inline-block;padding-top:0;color:#363959;font-family:sans-serif;padding-left:20px;padding-right:20px;margin-top:0;margin-bottom:0">Private Email Relay</h3>
                </td>
              </tr>
            <tr>
              <td align="center" style="line-height:150%;padding-left:20px;padding-right:20px">
                <p style="display:inline-block;padding-top:0;font-size:13px;color:#363959;font-family:sans-serif;padding-left:20px;padding-right:20px;margin-top:0;margin-bottom:0">
                  <strong>From:</strong> {email_from}
                </p>
              </td>
            </tr>
            <tr>
              <td align="center" style="line-height:150%;padding-left:20px;padding-right:20px">
                <p style="display:inline-block;padding-top:0;font-size:13px;color:#363959;font-family:sans-serif;padding-left:20px;padding-right:20px;margin-top:0;margin-bottom:0">
                  <strong>To:</strong> {email_to}
                </p>
              </td>
            </tr>
            <tr>
              <td align="center" style="line-height:150%;padding-left:20px;padding-right:20px">
                <p style="display:inline-block;padding-top:0;font-size:13px;color:#363959;font-family:sans-serif;padding-left:20px;padding-right:20px;margin-top:0;margin-bottom:0">
                  <strong><a href="{email_archive_url}" target="_blank">Download original from archive</a></strong>
                </p>
              </td>
            </tr>
          </tbody></table>
        </td>
      </tr>
    </tbody></table>
"""- Go to the Configuration tab and create the following Environment Variables
| Name | Value |
|---|---|
| MailS3Bucket | Name of the newly created S3 Bucket |
| MailS3Prefix | Folder name in the bucket where you want to store your emails |
| MailRecipient | Email Address where you want to forward the emails |
| Region | AWS region where you created your resources |
Step 6: Create Receipt Rule in SES
- Go to the SES console and select the Email receiving tab.
- Create a new Rule Set.
- Now, create a new Rule in the Rule Set and give it a name.
- Next, you need to add Recipient Conditions, you can create specific recipients here or if you want to receive all emails addressed to your domain just enter the domain name here.
- Click on Next and add a new Action and select the Deliver to S3 Bucket from the dropdown, then select the S3 bucket that you created in previous steps.
- Add another action, this time select the Invoke Lambda Function from the dropdown and configure it to execute the lambda you created earlier.
Step 7: Verifying Your Real Email Address
When you create a new SES Identity, It is created in Sandbox mode, this means that your account has certain restrictions which include limit on number of emails you can send per day and where you can send those.
In Sandbox Mode you can only send outbound emails to verified addresses, this means you need to verify your real email address before you can start forwarding emails, if you don't do this, your Lambda function will fail while forwarding the emails.
Follow these steps to verify your email address.
- Go to SES Console and select the verified identities tab
- Add new Identity of type Email Address.
- Follow the instructions shown after that.
To send emails to non verified email address you need to move your account out of Sandbox, you'll need this if you also want to reply to the emails you receive via Private Relay. I'll cover this part in more detail the next post.
Step 8: Testing
That's it, we are done with setting up our own Private Email Relay, now its time to test it.
Send an email to any of the address which satisfies the recipient conditions you created earlier.
If you did everything correctly, you should see the email in the S3 bucket and your real inbox within a minute or two.
If you do not get the email within a few minutes, check the CloudWatch logs for any error messages and try to figure out where did it fail. If the email didn't trigger the rule and you don't see any logs then check your Domain configuration again and verify if you setup your MX records properly.
You can find the code for the Lambda function in this GitHub repository.
If you find any bugs or feel it can be improved in any way, please do raise issues on GitHub, or raise a PR.
References: